SOLAR VENTILATION SYSTEM > Solar Ventilation ECU Power Source Circuit |
| 1.INSPECT MOON ROOF GLASS ASSEMBLY (SOLAR PANEL) |
Leave the vehicle for 10 minutes in a location where the following conditions are met, and then measure the voltage.
| Items | Condition |
| Amount of sunlight | A sufficient amount of sunlight is received by the moon roof glass assembly (solar panel). (The amount of sunlight on a cloudless day between 11:00 and 14:00 is typically sufficient for operation.) |
| Moon roof glass assembly (solar panel) status | The moon roof glass assembly (solar panel) is not in the shade |
| No fallen leaves or dirt is present on the moon roof glass assembly (solar panel) | |
| Ambient temperature | 20 to 40°C (68 to 104°F) |
 |
Disconnect the solar ventilation ECU connector.
Measure the voltage according to the value(s) in the table below.
| Tester Connection | Condition | Specified Condition |
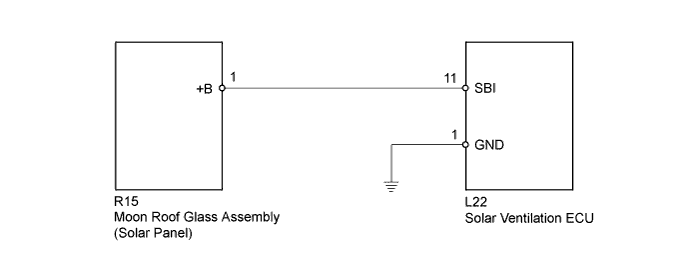
| L22-11 (SBI) - L22-1 (GND) | System operation requirements are met. | 12 V or higher |
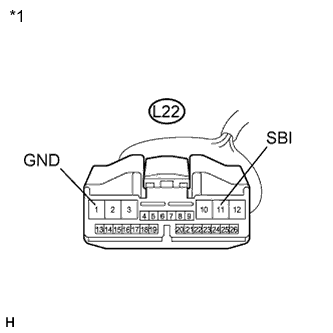
| *1 | Front view of wire harness connector (to Solar Ventilation ECU) |
|
| ||||
| OK | |
| 2.READ VALUE USING INTELLIGENT TESTER |
Reconnect the solar ventilation ECU connector.
Connect the intelligent tester to the DLC3.
Turn the power switch on (IG).
Turn the intelligent tester on.
Enter the following menus: Body / Air Conditioner / Data List.
Check the value(s) by referring to the table below.
Check that the Solar Voltage value in the Data List is 10 V or higher.
| Tester Display | Measurement Item/Range | Normal Condition | Diagnostic Note |
| Solar Voltage | Solar panel voltage / 10V les, 10V-11V, 11V-12V, 12V-13V, 13V-14V, 14V-15V, 15V-16V, 16V-17V, 17V-18V, 18V-19V, 19V-20V, 20V-21V, 21V-22V, 22V-23V or 23V ovr | Actual generated voltage displayed | System operation requirements are met (Click here). |
|
| ||||
| OK | ||
| ||
| 3.CHECK HARNESS AND CONNECTOR (SOLAR VENTILATION ECU - SOLAR PANEL, BODY GROUND) |
|
Disconnect the solar ventilation ECU connector.
 |
Disconnect the moon roof glass assembly (solar panel) connector.
Measure the resistance according to the value(s) in the table below.
| Tester Connection | Condition | Specified Condition |
| L22-11 (SBI) - R15-1 (+B) | Always | Below 1 Ω |
| L22-1 (GND) - Body ground | Always | Below 1 Ω |
| L22-11 (SBI) - Body ground | Always | 10 kΩ or higher |
| *1 | Front view of wire harness connector (to Solar Ventilation ECU) |
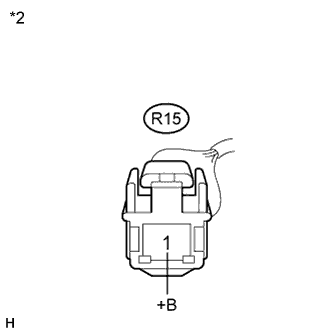
| *2 | Front view of wire harness connector (to Moon Roof Glass Assembly (Solar Panel)) |
|
| ||||
| OK | ||
| ||
