BRAKE FLUID > REPLACEMENT |
| 1. REPLACE BRAKE FLUID (for Using the intelligent tester) |
Remove the center cowl top ventilator cover.
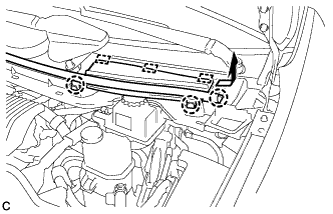 |
Slide the hood to cowl top seal and disengage the claw.
Disengage the 2 claws and 3 guides, and remove the center cowl top ventilator cover.
Replace brake fluid.
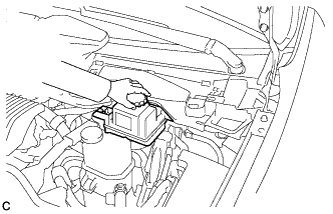 |
Remove the brake master cylinder reservoir filler cap assembly.
Add brake fluid into the reservoir between MAX and MIN level on the brake fluid reservoir.
Connect the intelligent tester to the DLC3 and turn the power switch on (IG).
Turn the intelligent tester on and enter the following menus: Chassis / ABS/VSC/TRC / Air Bleeding.
Select the "Usual air bleeding" on the intelligent tester display, and replace the brake fluid following the instructions on the intelligent tester.
After replacing brake fluid, tighten each bleeder plug.
Clear the DTCs (Click here).
Turn the intelligent tester off and turn the power switch off.
Inspect for brake fluid leaks.
Install the brake master cylinder reservoir filler cap.
Install the center cowl top ventilator cover.
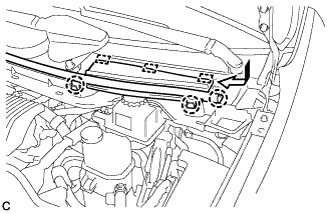 |
Engage the 2 claws and 3 guides to install the center cowl top ventilator cover.
Slide the hood to cowl top seal to engage the claw.
| 2. REPLACE BRAKE FLUID (for not Using the intelligent tester) |
| The shift lever is used to select from P to any other position. |
| Turn the power switch on (READY). |
| Turn the power switch off. |
| The parking brake is released. |
| The vehicle velocity is not 0 km/h (0 mph). |
Remove 4 wheels.
Select ECB (Electronically Controlled Brake system) Invalid Mode.
Perform the procedure listed below in 1 minute.
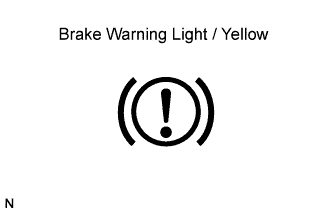 |
Check that the brake warning light / yellow is blinking.
Remove the center cowl top ventilator cover.
|
Slide the hood to cowl top seal and disengage the claw.
Disengage the 2 claws and 3 guides, and remove the center cowl top ventilator cover.
Replace the brake fluid.
|
Remove the brake master cylinder reservoir filler cap assembly.
Add brake fluid into the reservoir between MAX and MIN level on the brake fluid reservoir.
Connect a vinyl tube to the bleeder plug of the front disc brake cylinder assembly RH.
Depress the brake pedal several times, and then loosen the bleeder plug with the pedal depressed.*1
When fluid stops coming out, tighten the bleeder plug, and then release the brake pedal.*2
Repeat *1 and *2 until all the air in the brake fluid is completely bled out and a new brake fluid comes out.
Tighten the bleeder plug completely.
Replace the brake fluid from the front disc brake cylinder assembly LH using the same procedure as for RH.
Connect a vinyl tube to the bleeder plug of the rear disc brake cylinder assembly LH.
Loosen the bleeder plug while depressing and holding the brake pedal, and replace the brake fluid while the brake booster pump assembly and solenoid running.*3
Tighten the bleeder plug, then release the brake pedal.*4
Repeat steps *3 and *4 until all the air in the brake fluid is completely bled out and a new brake fluid comes out.
Tighten the bleeder plug completely.
Replace the brake fluid from the rear disc brake cylinder assembly RH using the same procedure as for LH.
Turn the power switch off.
Inspect for brake fluid leaks.
Adjust the brake fluid level in the reservoir (Click here).
Install the brake master cylinder reservoir filler cap.
Install the center cowl top ventilator cover.
|
Engage the 2 claws and 3 guides to install the center cowl top ventilator cover.
Slide the hood to cowl top seal to engage the claw.
Install the 4 wheels.
