OCCUPANT DETECTION SENSOR > INSTALLATION |
| 1. INSTALL OCCUPANT DETECTION SENSOR |
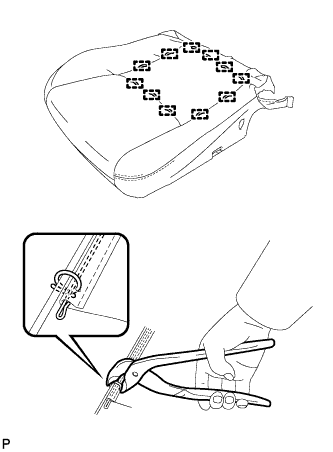 |
Using hog ring pliers, install 11 new hog rings.
 |
Using hog ring pliers, install the separate type front seat cushion cover to the occupant detection sensor with 2 new hog rings.
| 2. INSTALL FRONT SEAT CUSHION COVER WITH PAD |
| 3. INSTALL FRONT SEAT CUSHION INNER SHIELD |
| 4. INSTALL FRONT SEAT INNER BELT ASSEMBLY |
| 5. INSTALL FRONT SEAT CUSHION SHIELD ASSEMBLY |
| 6. INSTALL VERTICAL ADJUSTING HANDLE (w/ Vertical Adjuster) |
| 7. INSTALL RECLINING ADJUSTER RELEASE HANDLE |
| 8. INSTALL FRONT SEAT ASSEMBLY |
| 9. INSTALL INNER SEAT TRACK COVER |
| 10. INSTALL OUTER SEAT TRACK COVER |
| 11. INSTALL FRONT SEAT HEADREST ASSEMBLY |
| 12. INSTALL CABLE TO NEGATIVE BATTERY TERMINAL |
| 13. INSTALL REAR NO. 3 FLOOR BOARD |
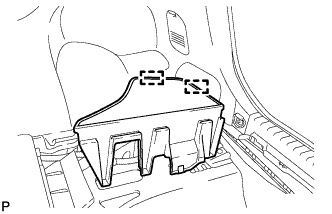 |
Engage the 2 guides to install the rear No. 3 floor board.
| 14. INSTALL REAR DECK FLOOR BOX |
Install the rear deck floor box.
| 15. INSTALL REAR NO. 2 FLOOR BOARD |
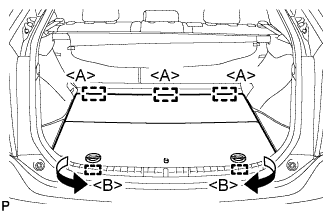 |
Engage the 3 guides <A>.
Engage the 2 guides <B> and install the rear No. 2 floor board as shown in the illustration.
| 16. INSPECT FRONT SEAT ASSEMBLY |
During sliding operation of the front seat, check that the left and right adjusters move together smoothly and lock simultaneously.
If the seat adjusters do not lock simultaneously, loosen the seat mounting bolts to adjust the adjuster position.
w/ Seat Heater Seat System:
Check the seat heater operation.
Turn the power switch on (IG).
Push the seat heater switch on.
Wait 5 minutes or more and confirm that the seat surface becomes warm.
| 17. INSPECT SRS WARNING LIGHT |
Inspect the SRS warning light (Click here).
