FRONT BUMPER > DISASSEMBLY |
| 1. REMOVE HEADLIGHT CLEANER WASHER NOZZLE LH (w/ Headlight Cleaner System) |
 |
Extend the headlight cleaner washer nozzle.
| *1 | Protective Tape |
Using a screwdriver, disengage the 2 claws and remove the headlight cleaner washer nozzle.
| 2. REMOVE HEADLIGHT CLEANER WASHER NOZZLE RH (w/ Headlight Cleaner System) |
| 3. REMOVE HEADLIGHT WASHER ACTUATOR SUB-ASSEMBLY LH (w/ Headlight Cleaner System) |
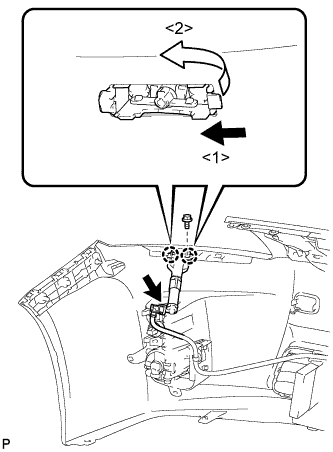 |
Disconnect the headlight washer hose.
Remove the bolt.
Disengage the 2 claws and remove the headlight washer actuator sub-assembly as shown in the illustration.
| 4. REMOVE HEADLIGHT WASHER ACTUATOR SUB-ASSEMBLY RH (w/ Headlight Cleaner System) |
| 5. REMOVE NO. 1 ULTRASONIC SENSOR (w/ Intelligent Parking Assist System) |
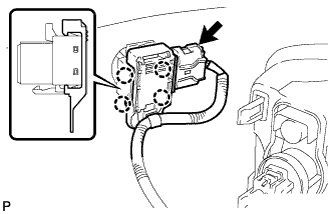 |
Disconnect the connector.
Disengage the 4 claws and disconnect the wire harness with bracket.
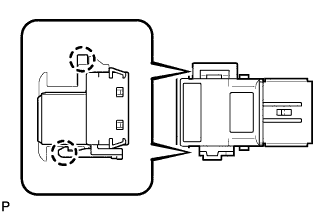 |
Disengage the 2 claws and remove the No. 1 ultrasonic sensor.
| 6. REMOVE NO. 1 ULTRASONIC SENSOR RETAINER (w/ Intelligent Parking Assist System) |
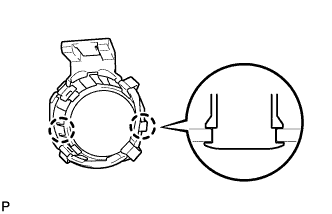 |
Disengage the 2 claws and remove the No. 1 ultrasonic sensor retainer.
| 7. REMOVE FRONT TURN SIGNAL LIGHT ASSEMBLY LH |
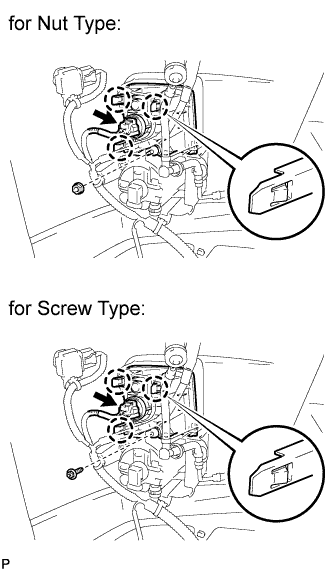 |
Disconnect the connector.
for Nut Type:
Remove the nut.
for Screw Type:
Remove the screw.
Disengage the 3 claws and remove the front turn signal light assembly.
| 8. REMOVE FRONT TURN SIGNAL LIGHT ASSEMBLY RH |
| 9. REMOVE FOG LIGHT ASSEMBLY LH (w/ Fog Light) |
 |
Disconnect the connector.
Remove the screw.
Disengage the 2 guides and remove the fog light assembly.
| 10. REMOVE FOG LIGHT ASSEMBLY RH (w/ Fog Light) |
| 11. REMOVE FRONT BUMPER EXTENSION MOUNTING BRACKET |
 |
Remove the 2 screws.
Disengage the 2 claws and remove the front bumper extension mounting bracket.
| 12. REMOVE HOOD TO FRONT END PANEL SEAL |
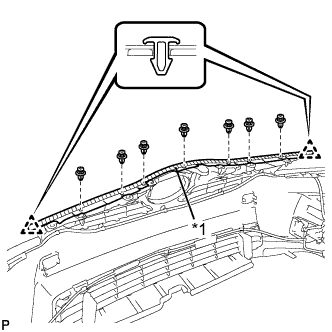 |
Remove the 7 clips.
| *1 | Double-sided Tape |
Disengage the 2 clips and remove the hood to front end panel seal.
| 13. REMOVE HEADLIGHT CLEANER HOSE (w/ Headlight Cleaner System) |
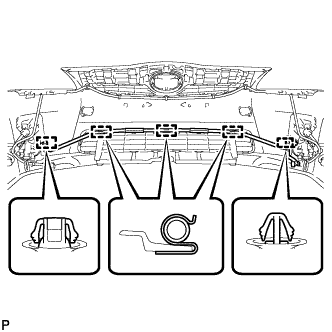 |
Disengage the 5 clamps and remove the headlight cleaner hose.
| 14. REMOVE ENGINE ROOM NO. 3 WIRE |
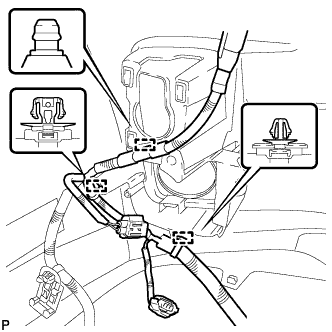 |
Disengage the 3 clamps.
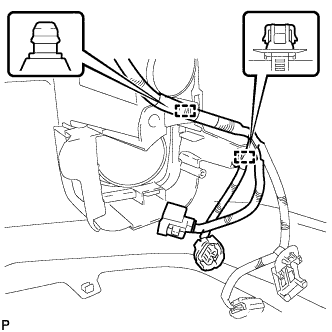 |
Disengage the 2 clamps.
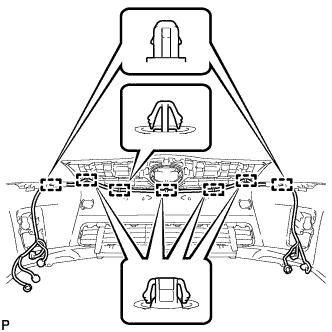 |
Disengage the 7 clamps and remove the engine room No. 3 wire.
| 15. REMOVE RADIATOR GRILLE |
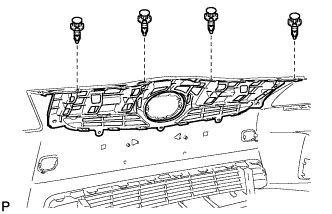 |
Remove the 4 clips.
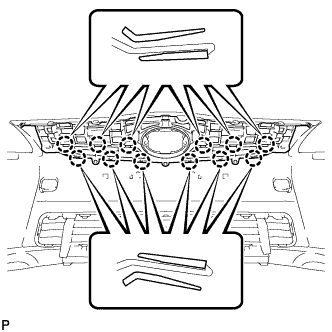 |
Disengage the 12 claws and remove the radiator grille.
| 16. REMOVE RADIATOR GRILLE EMBLEM ASSEMBLY |
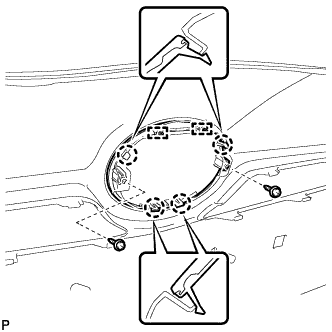 |
Remove the 2 screws.
Disengage the 4 claws and 2 pins, and remove the radiator grille emblem assembly.
| 17. REMOVE FRONT FENDER LINER RETAINER |
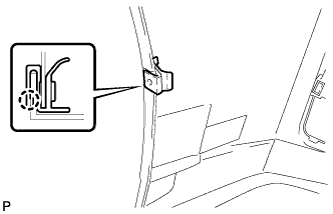 |
Disengage the claw and remove the front fender liner retainer.
| 18. REMOVE FOG LIGHT COVER LH |
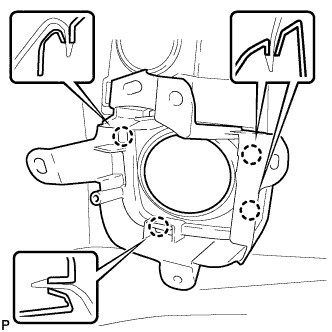 |
Disengage the 4 claws and remove the fog light cover LH.
| 19. REMOVE FOG LIGHT COVER RH |
| 20. REMOVE FRONT BUMPER HOLE COVER LH |
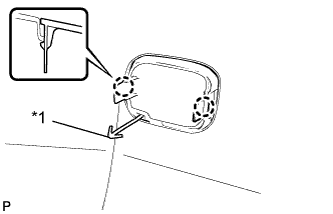 |
Disengage the 2 claws.
| *1 | Hook |
Disengage the hook and remove the front bumper hole cover LH.
| 21. REMOVE FRONT BUMPER HOLE COVER RH |
| 22. REMOVE NO. 1 LOWER RADIATOR GRILLE |
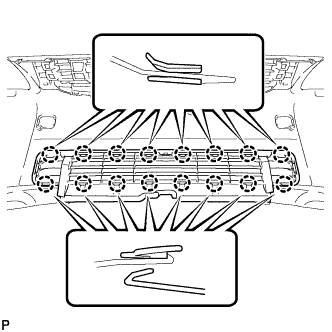 |
Disengage the 16 claws and remove the No. 1 lower radiator grille.
| 23. REMOVE FRONT BUMPER SEAL |
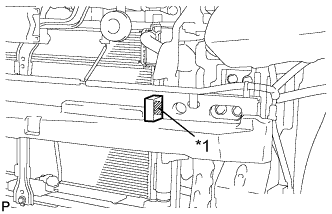 |
Remove the front bumper seal.
| *1 | Double-sided Tape |
| 24. REMOVE FRONT BUMPER ENERGY ABSORBER |
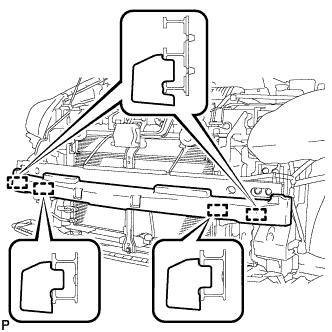 |
Disengage the 4 guides and remove the front bumper energy absorber.
| 25. REMOVE FRONT BUMPER REINFORCEMENT SUB-ASSEMBLY |
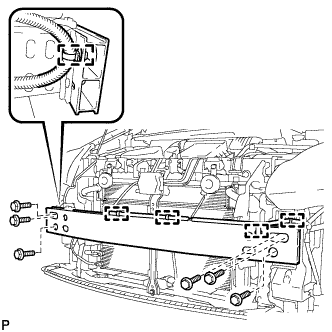 |
Disengage the 5 clamps.
Remove the 6 bolts and front bumper reinforcement sub-assembly.
| 26. REMOVE FRONT BUMPER SIDE SUPPORT LH |
 |
Remove the bolt and screw.
| *1 | Bolt |
| *2 | Screw |
Disengage the 2 claws and remove the front bumper side support LH.
| 27. REMOVE FRONT BUMPER SIDE SUPPORT RH |
| 28. REMOVE FRONT SIDE MEMBER BRACKET SUB-ASSEMBLY LH |
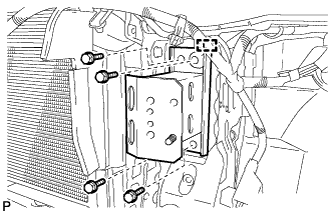 |
Remove the 4 bolts.
Disengage the guide and remove the front side member bracket sub-assembly LH.
| 29. REMOVE FRONT SIDE MEMBER BRACKET SUB-ASSEMBLY RH |