LIGHTING SYSTEM > INITIALIZATION |
| 1.PREPARE VEHICLE FOR INITIALIZATION |
Unload the vehicle and its trunk, ensuring that the spare tire, tools and jack are in their original positions.
Check that there are no occupants in the vehicle.
Turn off the headlights.
Stop the vehicle on a level surface and keep the vehicle height unchanged.
| |||||
| 2.CHECK HEADLIGHT BEAM LEVEL CONTROL INDICATOR LIGHT |
Turn the power switch on (IG), and check the indicator light.
| Condition | Specified Condition |
| The headlight leveling ECU assembly is replaced with a new one. | Indicator light continuously blinks 6 times at 2 Hz. |
| Replacement of the rear height control sensor sub-assembly RH, removal and reinstallation of the rear height control sensor sub-assembly RH, replacement of the suspension, etc. is performed. | Indicator light comes on for approximately 3 seconds, and then goes off (bulb check function). |
|
| ||||
| |||||
| 3.INITIALIZATION |
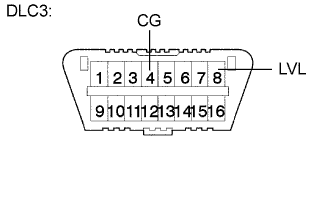 |
Connect terminals 4 (CG) and 8 (LVL) of the DLC3 using SST.
 |
Turn the low beam headlights on and off using the light control switch within 20 seconds after connecting the terminals.
| Fuel Level | Number of Times to Turn Low Beam Headlights on and off |
| Fuel level is within A range. | 1 |
| Fuel level is within B range. | 2 |
| Fuel level is within C range. | 3 |
| Fuel level is within D range. | 4 |
| Fuel level is within E range. | 5 |
Check the indicator light.
| Condition | Specified Condition |
| The headlight leveling ECU assembly is replaced with a new one. | Blinks 6 times at 2 Hz → Continuously blinks N*1 times at 2 Hz. |
| Replacement of the rear height control sensor sub-assembly RH, removal and reinstallation of the rear height control sensor sub-assembly RH, replacement of the suspension, etc. is performed. | Off → Continuously blinks N*1 times at 2 Hz. |
|
| ||||
|
| ||||
|---|---|---|---|---|---|
